How to Root Motorola One Fusion Plus Using SuperSu & Magisk
Do you want to know how to Root Motorola One Fusion Plus then you are at the right place? Today in this article I am going o show you 4 different methods to root moto one fusion plus easily.
Before moving ahead let us know Motorola one fusion plus. Motorola one fusion plus is a budget segment smartphone with 6GB RAM and 128GB internal storage. Along with this, it is powered with Snapdragon 730/730G chipset with a quad-camera setup that makes it a perfect choice for the budget users.
Talking about the battery life it is coupled with 5000 mAh battery that is enough to hold the charge for a day in heavy usages. Let us move ahead and root motorola one fusion plus.
How to Root Motorola One Fusion Plus?
There are many ways through which you can root any android device not only motorola. And in this article, I am going to show you how to root Motorola one fusion plus using 4 different methods including supersu, magisk, PC, or without PC.

Rooting an Android device void the warranty and may also lead to some serious problems such as breakdown, boot loop, or stuck at boot logo. So do it at your own risk.
#1. Root Motorola One Fusion Plus Using SuperSu.
Supersu is one of the best ways to root any android device within a second. All you need to inject the supersu script in the device and voila your device will be rooted.
Step 1. First of all download Supersu.zip for motorola one fusion plus.
Step 2. Download and Install TWRP recovery for Motorola One Fusion Plus. Once done boot the device into Recovery mode.
Step 3. Once you are in TWRP recovery. Select Install and then choose the Supersu.zip file from the storage and Swipe Right to Confirm Flash.
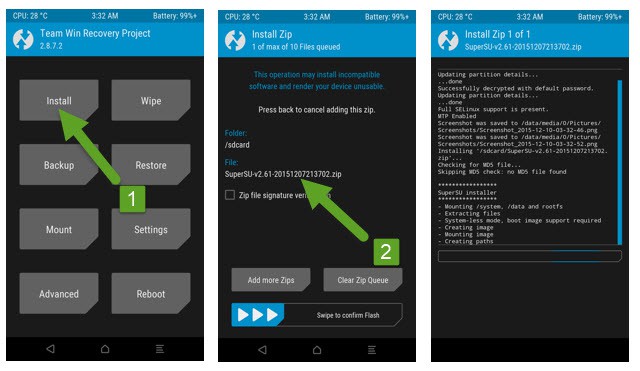
Step 4. It will take some time to flash the zip file. Once done you will see a successfully flashed message.
Congrats, you have successfully rooted motorola one fusion plus using supersu.zip.
#2. Root Motorola One Fusion Plus Using Magisk.
Magisk is one of the popular ways to root any android device seamlessly. Along with this it also provides advanced features such as hide root from the device.
Hiding root from the device will help to bypass the Google Root Integrity test and allow you to install and use financial and banking applications that do not run on a rooted android device.
Step 1. First of all download Magisk.zip and LazyFlasher.zip for the Motorola one fusion plus.
Step 2. Now boot into the recovery mode by pressing Volume Down + Power Button at the same time until you show a Motorola logo.
Step 3. Once you are in TWRP recovery, navigate to Install and locate magisk.zip file from the storage and select it.
Step 4. Now click on Add more zip and select LazyFlasher.zip from the device storage and Swipe right to confirm flash. This will take a while to flash the zip files.
Step 5. Go back to the TWRP home screen and select Reboot and then tap on Reboot System to reboot the device.
Once the device is rebooted you will have a rooted Motorola one fusion plus with magisk installed. If you dont see magisk manager on app drawer then download it from here.
Also Read | How to hide root from the android using magisk manager?
#3. Root Motorola One Fusion Plus Using Kingoroot (Without PC)
If you dont have a pc and want to root Motorola one fusion+ using the android device then you can use the Kingoroot application. Kingoroot supports many devices and gives a 100% succeding rate for rooting the android device.
Step 1. Download and Install the Kingoroot application on your android device.
Step 2. Once installed, open the Kingoroot application and tap on One Click Root button.
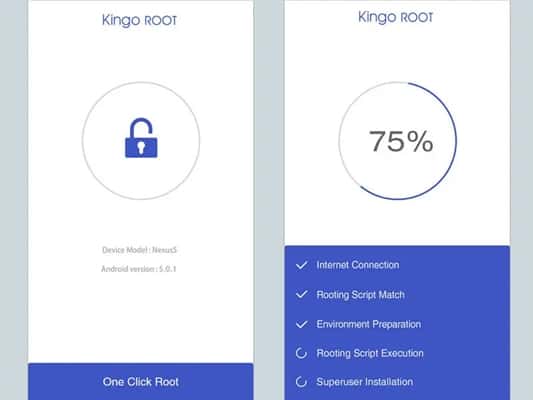
Step 3. Now the Kingoroot will start injecting rooting script on your device. It will take a while.
Step 4. Once the rooting is succeed it will show a message “Root Succeeded“.
#4. Root Motorola One Fusion Plus Using PC
There are tons of rooting software are available on the internet to root any android device in a single using computer. Kingoroot for PC is one of them. All you need to download the kingoroot for PC in your Windows computer and that’s it.
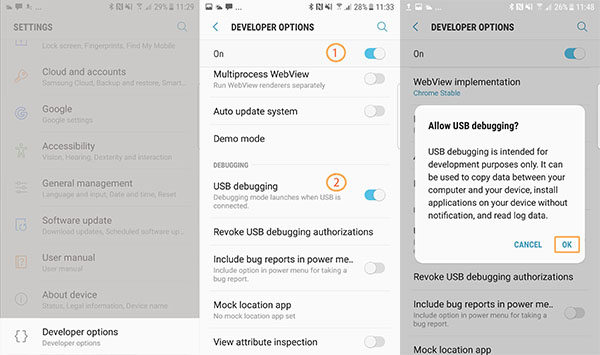
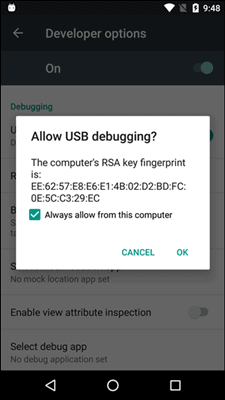
Step 1. Enable USB debugging on Android. To do that simply navigate to Setting > About Phone > Tap 5-7 times on build number to enable developer option.
Step 2. Now go back and select Developer Option from menu and enable the USB debugging option.
Step 3. Download and install Kingoroot for PC in your windows computer.
Step 4. Run the Kingoroot application on your PC and connect your device to the PC using USB cable.
Step 5. Now you will show a USB debugging prompt on the android screen just allow the permission.
Step 6. Tap on Root in Kingoroot for PC and it will star rooting motorola one fusion plus.
Once done unplug the device and start using it.
Wrapping Up
Rooting an android device is very easily if followed all the steps carefully. Here I have listed 4 different methods to root Motorola one fusion plus with Supersu, magisk, pc, and without pc. Choose one method from the above-mentioned method to root moto one fusion plus.
Remember dont interrupt the rooting process once it started. If you interrupt the process your device may be stuck at the boot loop or won’t start again. In this type of case, you need to flash the stock firmware in Motorola one fusion plus.
If you have successfully rooted your Motorola one fusion plus share your journey with others. If you have any doubt ask them in the comment section below.