How to Install TWRP Recovery on Motorola One Fusion Plus
Motorola One Fusion Plus is the newly launched budget-friendly smartphone by Motorola. It is the perfect choice for photo enthusiasts and mobile gamers. If you are a PUBG lover or want to shoot high-quality photos right from your phone then this phone is made for you.
Motorola is known for its stock android user interface and lots of gesture options. But if want to explore your newly purchased moto one fusion plus then you need to install TWRP recovery on Motorola one fusion plus.
After that, you can easily root your android phone and install custom ROM and kernels. You can also perform various actions like factory resetting the device and many more. In this article, I am going to show you how to install TWRP recovery on moto one fusion plus.
But before proceeding lets know what is the TWRP recovery and why you really need it.

What is TWRP Recovery?
TWRP formerly known as Team Win Recovery Project is a custom recovery for the android device. When you purchase an android device it came with a stock android recovery. This stock recovery is limited to a certain function.
Like you can only use stock recovery to update and restore the system or to reset the device to factory default in case you forgot the device pattern or password. But custom recovery provide a lot of features compared to the stock recovery.
Here are some of the benefits and functions that you can perform with a newly installed TWRP or CWM recovery.
Benifits of TWRP Recovery
- You can easily root your android device right from the recovery.
- You can flash any type of script and zip files.
- Easily install custom ROM on your devices.
- Backup and restore your full Android device.
- Update the android to the latest version.
- Change filesystem from EXTFAT to F2Fs.
- Create and change partitions.
- Factory reset your device in case you forgot the device lock.
- Install the custom kernel.
Drwabacks of TWRP Recovery
- The device warranty is void.
- Future OTA (On The Air) updates cannot be installed.
- If flashed incorrectly your device can be brick.
- Require android expertise for certain functions.
Now you know that what are the advantages and disadvantages of installing the TWRP recovery on the android device. This is the same for the other custom recoveries also. So if you still want to install TWRP recovery on Motorola one fusion plus the proceed ahead.
How to Install TWRP Recovery on Motorola One Fusion Plus
There are three popular methods to install TWRP recovery on Motorola One Fusion Plus. If you have a computer then you can easily install the recovery with a 100% success rate. But for mobile users, the chances of success are slightly low.
So choose the method below to install the TWRP recovery on Motorola One Fusion Plus. If you want a higher success rate go with the computer method, if you don’t have a PC then go with a mobile device.
Note: Perform a full android backup before installing the recovery on the device. This process can also brick your android device and stop from booting up. So do it at your own risk.
Method 1. Using Computer (100% Success Rate)
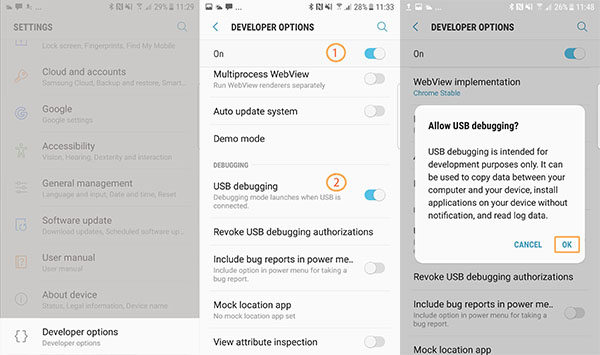
Step 1. Go to the Device Setting > About Phone > And tap on 7-8 times on the Build Number to enable the developer option.
Step 2. Navigate to Setting > Advanced Settings > Developers Options > Enable “USB Debugging” and “OEM Unlock”.
Step 3. Download and install the ADB Fastboot and Motorola Drivers on your computer.
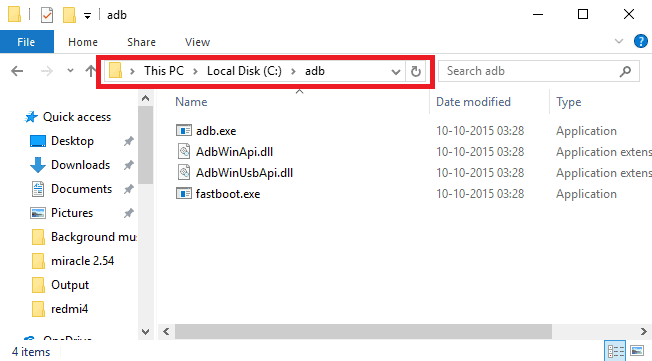
Step 4. Now download the TWRP recovery for Motorola One Fusion Plus from the official TWRP site. Remember the codename for Motorola One Fusion Plus is Titan. Make sure you download the correct TWRP recovery and place it in the ADB folder inside C drive.
Step 5. Turn off your device. Now press and hold Volume Down + Power Button until you see the android logo to boot the device into Download Mode.
Step 6. Connect your device to the computer using USB Cable. Now the computer will detect the Motorola One Fusion Plus.
If your computer does not detect the device (USB not recognized) that means you need to reinstall the Motorola drivers on the computer and restart the pc. Now again connect the device and the computer will detect it.
Step 7. Go to C: Program Files (x86)Minimal ADB and Fastboot and right-click on py_cmd.exe and run it as administrator
Step 8. Now type “fastboot flash recovery recovery.img” in the command terminal to start the flashing process.
The flashing process will take around 3-5 seconds and you will get the following message on completion.
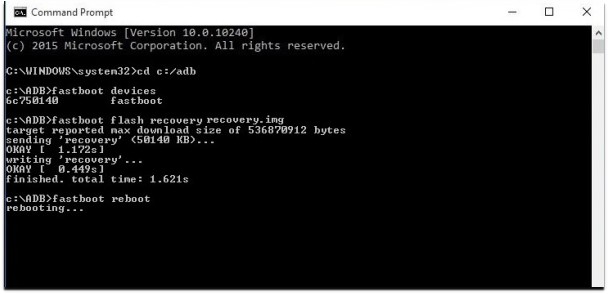
Congrats, you have successfully installed the TWRP recovery on Motorola one fusion plus. Now you can unlock your device and run it on its full potential.
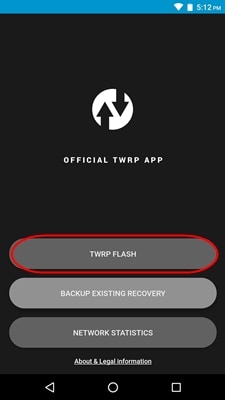
Method 2. Using TWRP App (50% Success Rate)
If you don’t have a PC and want to go without pc then you can use the official app to install TWRP recovery on Motorola one fusion plus. This method requires a rooted device. So make sure your device is rooted.
Step 1. First of all download and install the TWRP App from the Google Play Store.
Step 2. Open the TWRP app and grant the Root Access.
Step 3. Tap on the TWRP flash from the menu and search the TWRP recovery for Motorola One Fusion Plus.
Step 4. Download the latest version of the TWRP recovery for your device to the internal storage.
Step 5. Go back to the TWRP app and tap on Flash TWRP and select the recovery from the location where you downloaded. Once selected click on Flash to Recovery button and it will start flashing.
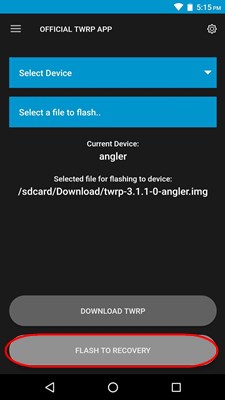
The process will hardly takes 3-5 second and show a success message.
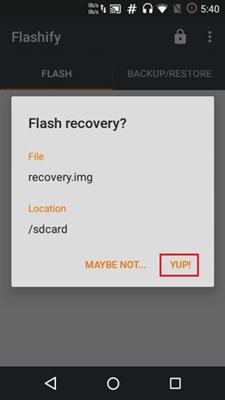
Method 3. Using Flashify App
If the above method does not work for you then you can also try flashify app which is very popular for installing the custom recovery on an android device.
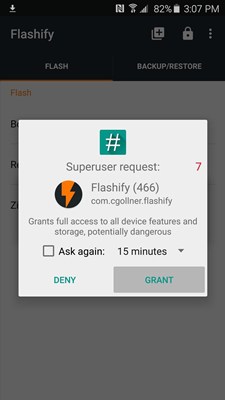
Step 1. Download and install the Flashify app from the Google Play Store.
Step 2. Open the app and grant the Root Privilege.
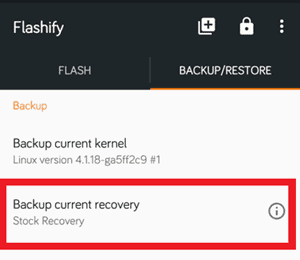
Step 3. Backup the existing TWRP recovery so you can restore it back if anything goes wrong. To do that simply navigate to Backup & Restore > Backup Current Recovery > Choose the backup location and Save.
Step 4. Flashing the recovery by going through Flash > Recovery Image > Download the latest recover and click Flash.
Now reboot the device and you will have a newly installed TWRP recover on Motorola one fusion plus. Since you have installed the TWRP recovery on the device you can now root your device, install custom rom, and perform various other functions.
But before doing all this make a full android backup which allow you to restore the device in the same situation with all your data.
Conclusion
Although Motorola One Fusion Plus is a flagship device some users still love to play with the custom rom. And to install the custom rom you must need to install TWRP recovery on Motorola one fusion plus only after that you can proceed.
All the methods shown here are works great but I will prefer the computer method because it gives the 100% success rate and the chances of bricking the device are very low. That’s enough for now. If you like the article dont forget to share it on social media.