Download Epson Resetter Tool for Epson L210, L220, L120 and more.
Why does the Epson Printer in giving the warning about Page stuck or Low Ink? This is a common problem in Epson L210, Epson L220, Epson L120, Epson L380, and more. This problem can be solved by the Epson Resetter tool which can reset all the problems of your printers.
Epson printers are more popular this day than their All In One printer. All in One Printer includes Scanner, Xerox function, and Both printer including Blank and White or Colour Printer.
But Epson printers are getting the victim of many problems just like Showing Page Stuck even if the page is not stuck in the printer. Another error is about Ink Reset, it happens when your printer is used for a long time after the ink level is low below the recommended value.
Also, Check | Download Epson L3110 Resetter Tool for Free 2020 | Unlimited Use
So this makes your printer give the warning about Ink. Even after filling ink in the bottle of the printer, the printer gives the warning of a low ink level.
All the problem discussed above are the common problems occurs in Epson L210, Epson L220, Epson 120, Epson 380 and much more printers of Epson. But this problem can be easily solved by a resetter tool named Epson Resetter Tool.
What is Epson Resetter Tool & How it’s Works :

Epson Resetter Tool is a simple tool developed by Epson’s Developer to help people who suffer from many printer errors. Mostly this tool is only provided to Epson Service Center by Epson.
But nowadays these tools are also available on the internet. I have also uploaded this tool to help others save their time-wasting to reset printer errors. You can download the Epson adjustment program or resetter tool from the below link to solve Epson printer errors.
This resetter tool works on simple principles. It just reset all the counter of Epson Printer Chip so the printer got only initial value. This means that your printer is never used, no copies have been made in the printer.
Resetting the counter tells the printer that there was no page stuck in the printer and the level of ink is also not low. In this way, the tool plays with the Epson chip to fix the false errors.
How to Download Epson Resetter Tool in PC/Computer and install it
Many fake tools are available on the Internet, So don’t trust any tool they can also harm your PC. Hackers also use this type of software to hack your PC, so be aware of them.
Here I am providing the Genuine Tool. You can download the Epson Resetter Tool from here free of cost. This tool is scanned by Antivirus and it does not contain any virus. So feel safe to download this.
After Download the Resetter Tool, simply install the tool on your PC connected with the printer. Here are the below steps to install Epson Resetter Tool in your PC.
Step 1. Double Click on the Downloaded File.
Step 2. A Popup will open asking for Administrative Privilege, Click on allow and continue.
Step 3. Now Click Agree on the terms and click on Next.
Step 4. Choose the location where you want to install Epson Resetter Tool. If you don/t know where to install leave it as default (C:\Program Files (x86)\Epson Resetter Tool) and click on next.
Step 5. Now Resetter is started installing in your Computer. Once installing is completed you can open it.
How to Reset Low Ink Error using Epson Resetter Tool
This error can be easily fixed in just a couple of minutes. This method works like a charm for your printers.
First of all know how these problems occur in your Epson printer which may be Epson L210, Epson L220, or Epson L380, or much more. This method work for all the Epson Printers.
Let us this you are using your printer and your ink levels are low, then your printer gives you a warning on the computer that your ink is low well as it also gives a warning by Red Light on Printer.
When you use the printer even after the ink is over in bottles or ink level is low. Your printer will be suddenly stopped. Even after filling ink in the bottle, the printer gives you a warning.
So to clear the warning of the printer you have to Download the Epson Resetter Tool and reset the counter in the setting of the Resetter Tool.
Follow the below steps to reset low ink error in your Epson Printer :
Step 1: Download Epson Resetter Tool from here.
Step 2: Install the Epson Resetter Tool as shown in the above steps. (Note: Here there is no need to installing its direct launch file)
Step 3: Now open the resetter tool by double-clicking on the file name.
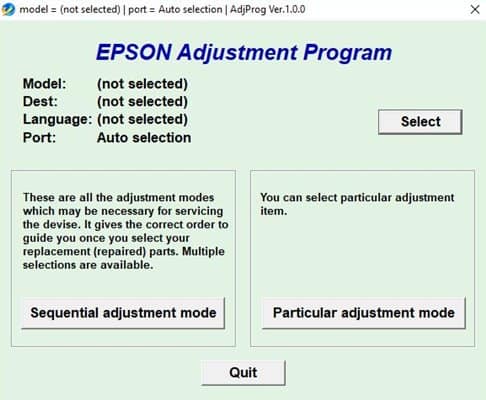
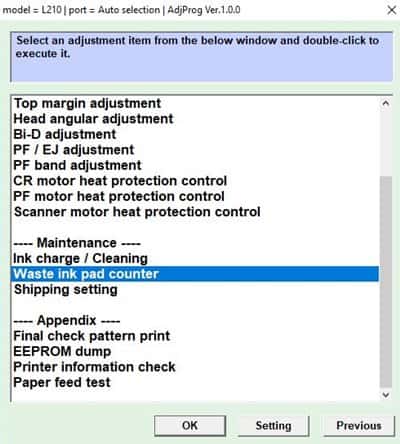
Step 4: Now click on the Particular Adjustment Mode as shown in Fig
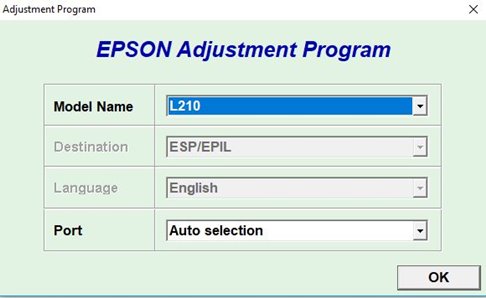
Step 5: Select your printers model name as shown in fig. Here I am resetting my Epson L210 so I will picks up it.
Step 6: Click on the problem which is Waste Ink Pad Counter.
Step 7: Now check the box to enable Main Pad Counter, By enabling this option the Epson Resetter Tool will reset the counter of Epson L210.
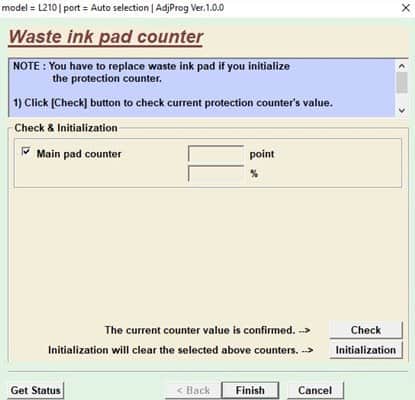
Step 8: Click on the Check button as shown in figure after press the Initialization button to start the progress. Now a popup window ill open, Click on “Ok” when done.

Step 8: Now restart the printer just by Turning off the Switch of the Printer or By Pressing the Power Off Switch on the Printer. Finally, you have successfully reset the counter and clear the ink problem.
Conclusion :
Download Epson Resetter Tool and do the following steps as discussed above to clear Epson L0, L380, and much more errors. This tool saves you errors lots of money which you spend in the Service Center. If you really like the article please share it and comment below about your success stories.


How to download there is no link?
The download link has been updated. Use the password “Rahul#403” to unzip the file.
Good Job, I really appreciate your effort. Keep it up Bro!
If you love the article then share it with friends and help them too.
Good day…
Do you have a epson l3110 resetter?
Tanx..
Yes, we do. Look at here